Texting, text Campaigns & Keyword campaigns
MIXER facilitates both long-code and short-code texting, allowing on-air talent to interact in real-time via one-to-one correspondence with listeners, run keyword contests via long-code, or push text notifications to the entire database using short-code (one-to-many) correspondence.
You can also create non-text Keyword Campaigns, in which listeners can log in via desktop or mobile app and enter keywords in exchange for points.
Let’s take a closer look.
Jump to:
Long-Code Texting with Listeners
Rebound Text Campaigns (via request line) (Ideal for contesting)
Push Text Campaigns (short-code)
Keyword Campaigns for Points
Long-Code Texting with Listeners
Long-code is simply a 10 digit number. For our purposes, it’s the listener’s mobile phone number and the station’s request line. Long-code texting can be used for all one-to-one communication, so basically it’s just like texting with your friends. If you want to send a text to a large group, you’ll need to use short code, which we will discuss below.
The long-code text interface, simply labeled as “Texts” in the Mixer Admin Backoffice, is where producers or on-air talent can engage directly with listeners in real-time via text message. This is a great way to encourage participation and engagement with both members and non-members. Let’s take a look:
To access the Text interface, login to the Backoffice with your Admin credentials, and look for the “Texts” link on the left-hand navigation bar. See fig. 1. Note that this navigation menu may look different depending on your individual level of access.
Click the “Texts” link, and you’ll be taken to the text dashboard. The text dashboard will look similar to fig. 2.
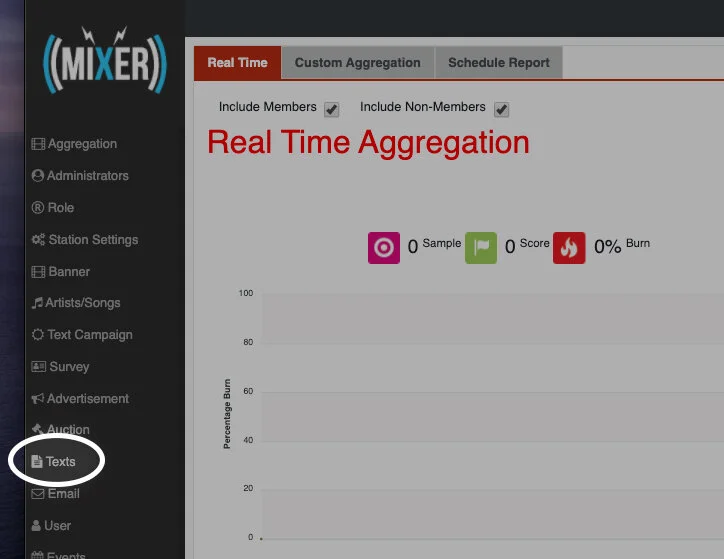
FIG. 1
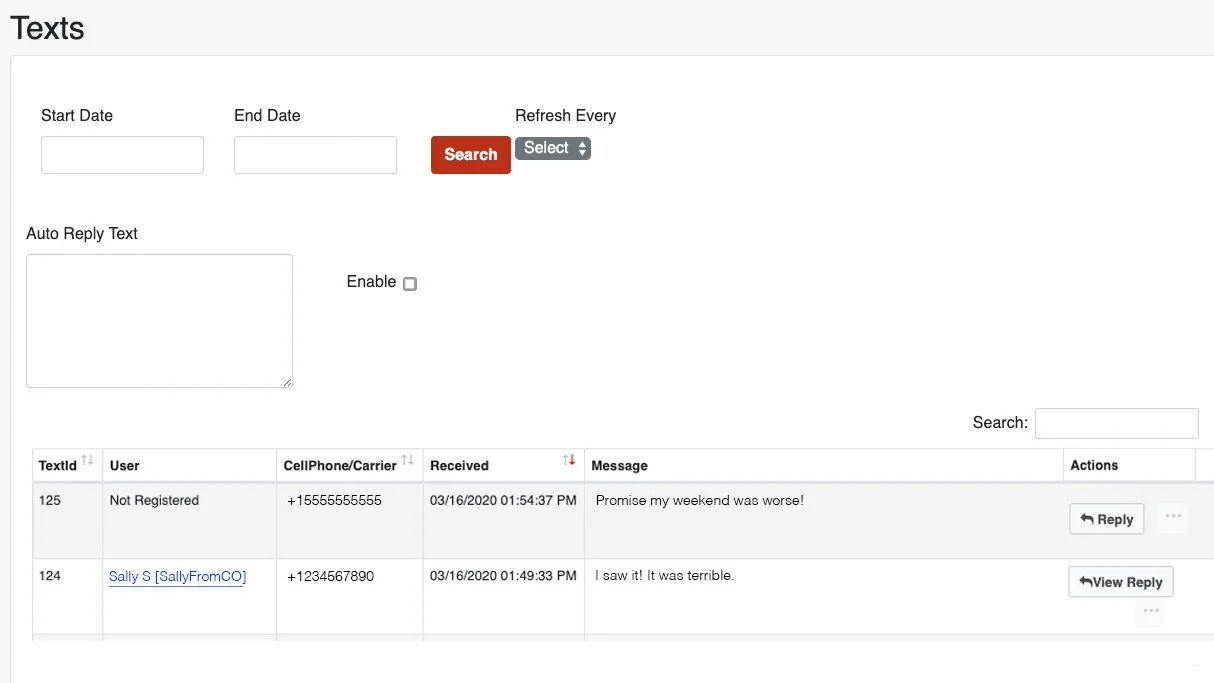
Fig. 2
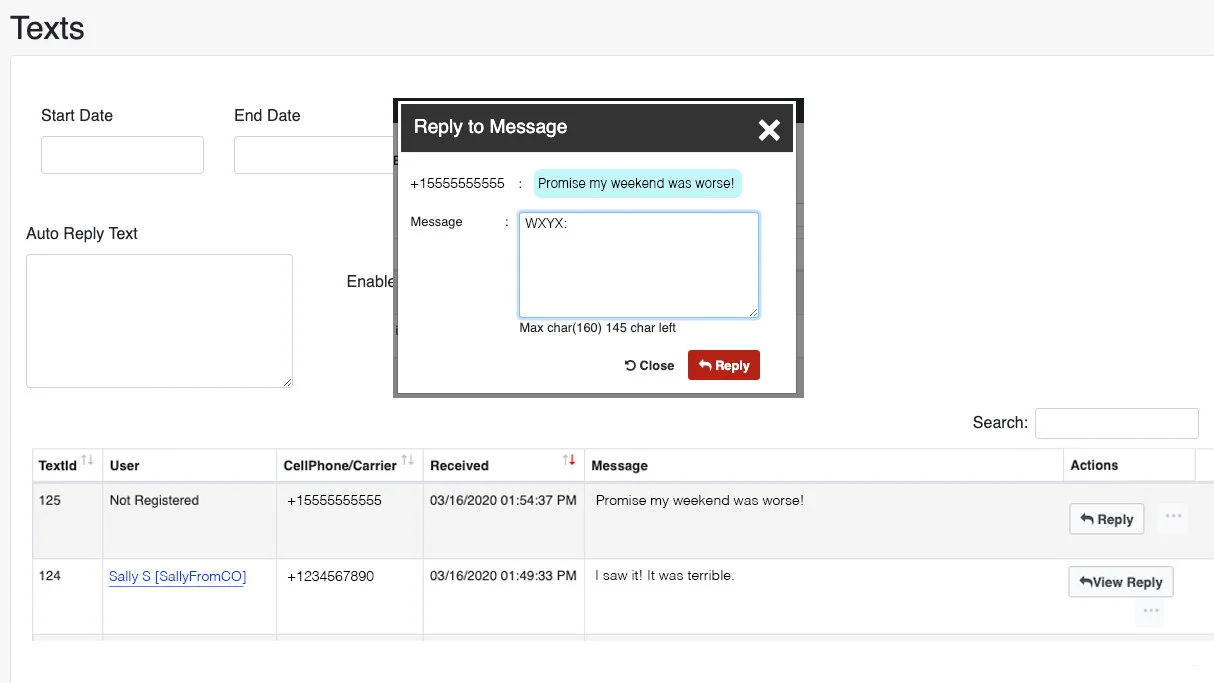
Fig. 3
Here’s an overview of the fields on the screen:
Start and End Dates. This is optional. It will filter the texts displayed to only show you messages received during the specified time frame.
Refresh frequency: Select how often you’d like the page to refresh. This is so you don’t have to manually refresh it to see new incoming messages.
Auto-Reply Text: Also optional, this is text that will be automatically sent in response to every inbound text message. Be sure to enable or disable as needed.
At the bottom of the screen, you’ll see a list of text messages received. A user listed as “Not Registered” is a user who has not signed up and completed a profile in the loyalty club. A listener with a name in blue and underlined is a member. Clicking on their name will open another window containing details about that person.
To the right of the listener’s message, you’ll see a button that says “Reply.” Click it and a new window (Fig. 3) will open, allowing you to type a message back to the listener.
Your response is limited to 160 characters. There is a counter that will stop you from exceeding this.
If you (or anyone at the station) has replied, the button will say “View Reply” instead of “Reply.”
The ellipsis menu (the three dots to the right of the Reply button) will give you additional options. If the message was sent by a non-member, “Delete” will be the only option. If the message was sent by a member, “Delete” and “View Sender Profile” will be available.
Be sure to read the Texts section in Tips & Best Practices to ensure you’re using this portion of the platform as effectively as possible.
Rebound Text Campaigns
A Rebound Text Campaign generates an auto-reply to the listener when they text (via your request line) a designated keyword.
Example: On-air talent asks listeners to text a keyword during a certain timeframe for a chance to win a pair of passes to a local brewery. Sponsor receives on-air mentions, and all participants are tagged. For this example, the keyword is “IPA”. See Fig. 4.

Fig. 4
Select campaign type “Text Rebound” to enable a rebound auto-reply.
Select start date/time and end date/time.
Tag it! Don’t forget to include the client’s name as a tag.
Insert your keyword.
Specify how many times a listener can enter, and how often. For example, in this case they can only enter once. You could also allow once (or two, three, four times, etc) per hour, per day or per week. Or you can specify that there is no limit at all.
Check the “Send Auto-Reply” checkbox.
Type the auto-reply message that the MEMBERs will receive.
Do you want non-members to be able to participate? If so, check the “Allow Non-Member” checkbox.
Want to send non-members a different reply? If so, check the Non-Member Different Reply checkbox, and type the message. This is a good opportunity to create marketing messaging to encourage non-members to sign-up!
Click “Save”.
Note: If you have Auto-Reply Text enabled on your text page, your contest auto-reply will override and be the only auto-reply message sent to the listener for this particular text.
To view progress or choose a campaign winner, return to the main Keyword & Text Campaign screen. Note the column titled “Replies.” This will show you the total number of replies received. See fig. 5.
Click on the ellipsis (the three dots) menu to the far right, and choose “View Replies.”
See fig. 6. In the user column, you will see the usernames of members, and the phone numbers of non-members who have replied to this campaign.
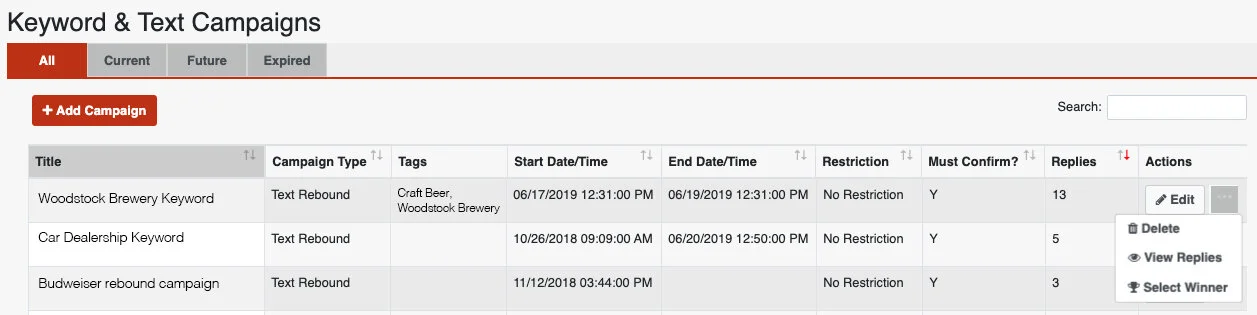
Fig. 5
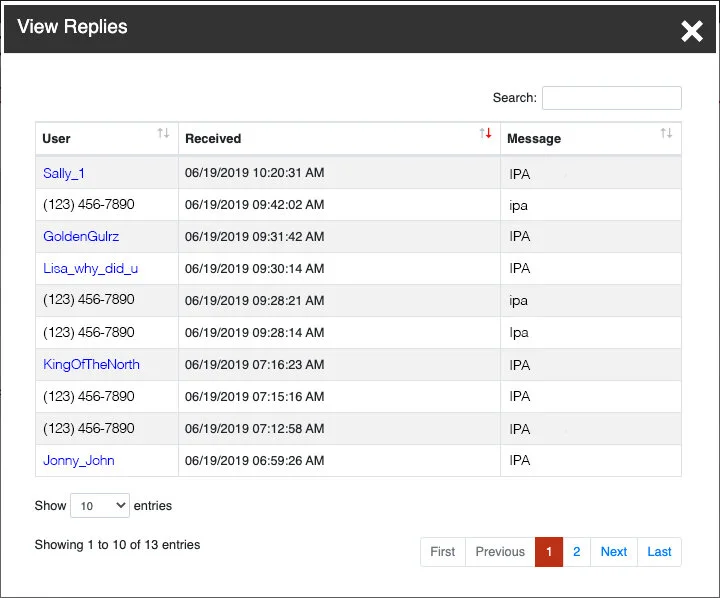
Fig. 6
Clicking on a member’s user-name will display further information about that user. Non-member phone numbers are not clickable as there is no additional information to display.
Ready to pick a winner?
See fig. 7.
Return to the main Keyword & Text Campaign screen, and again select the ellipsis menu to the far right of your campaign.
Choose “Select Winner.”
When the Select Winner screen appears, enter the number of winners you need to select.
Click the “Select” button.
Mixer will randomly choose the specified number of winners from the campaign entrants and display them.
If winners have previously been chosen for that campaign, their names will be displayed below.
Member’s usernames will be clickable. Non-member’s phone numbers are not clickable.
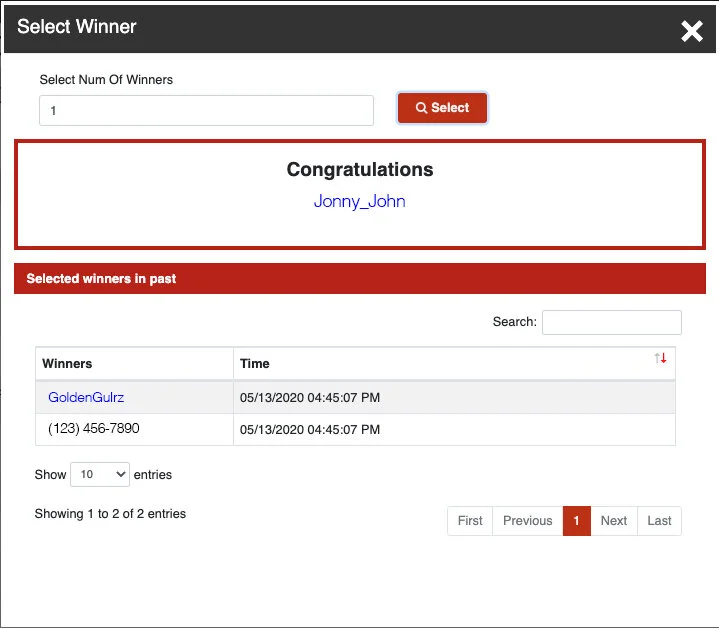
Fig. 7
Push Text Campaigns (Short-Code)
A push-text campaign is simply a text message, sent via short-code, that is pushed to a large portion of your database. Currently, you can choose to push the message to all members or all non-members who have engaged via text in some way.
Use a push message as a way to drive engagement. For example, rather than pushing a message with a pre-sale code, post the pre-sale code on a banner inside of Mixer, and use the push message to alert people, telling them to login to get the code. See figure 9.

Fig. 8
To build your campaign, click “Add Campaign” from the Keyword & Text Campaigns screen.
Title your campaign. This title is not publicly visible.
Choose “Text Push” for the Text Campaign Type.
Set a start date. **NOTE - the start date is required for database purposes, but does not trigger the push. You’ll need to manually do that in a few steps.
End date, tags, points and keyword do not apply.
Type the message. You will be limited to 160 characters. If you’re including a URL, use a URL shortener like TInyURL or bit.ly.
Click “Save”.